Save $3,000 on Labour Costs 💰
Are you tired of looking at your old, worn-out floors but dreading the massive contractor bills? You’re not alone! The average homeowner pays between $2,000-$8,000 in labour costs alone for professional flooring installation. But here’s the exciting news: with the right approach, tools, and guidance, you can achieve professional-quality results yourself and pocket those thousands of dollars instead! 🏠✨
In this comprehensive guide, we’ll walk you through everything you need to know about DIY flooring installation, from choosing the right materials to troubleshooting common problems. Whether you’re planning to install hardwood, laminate, vinyl, or tile, this guide has got you covered.
Why DIY Flooring Installation Makes Perfect Sense 🔨
Let’s face it – professional flooring installation is expensive! You can save money on your flooring installation project by doing some prep work. Removing old carpet or other flooring yourself may save you up to $3.50 per square foot, and DIY can save you serious money. You’ll pocket the $2-$8 per square foot that would otherwise go to labor costs. On a 500-square-foot project, that’s $1,000-$4,000 staying in your wallet.
Beyond the obvious cost savings, DIY flooring installation offers several compelling benefits:
Complete Control Over Quality 🎯 When you install your own floors, you control every aspect of the project. No rushing to meet deadlines, no cutting corners to maximize profit margins. You can take your time to ensure every plank is perfectly aligned and every cut is precise.
Flexible Scheduling ⏰ Work on your timeline! Install floors on weekends, evenings, or whenever it’s convenient for you. No waiting weeks for contractor availability or dealing with scheduling conflicts.
Skill Development and Satisfaction 💪 There’s nothing quite like the pride that comes from completing a major home improvement project with your own hands. Plus, you’ll develop valuable skills that will serve you well in future projects.
Immediate Problem Resolution 🛠️ When issues arise (and they sometimes do), you can address them immediately rather than waiting for a contractor to return. This prevents small problems from becoming big headaches.
Choosing the Right Flooring Material for DIY Success 📋
Not all flooring materials are created equal when it comes to DIY installation. Here’s your guide to the most DIY-friendly options:
Laminate Flooring: The DIY Champion 🏆
When it comes to DIY flooring installation, laminate, and LVT are the easiest types to install without compromising on style or durability. Laminate flooring features:
- Click-lock system that snaps together like a puzzle
- No glue or nails required for most installations
- Forgiving installation process that hides minor imperfections
- Wide variety of styles mimicking hardwood, tile, and stone
- Budget-friendly pricing starting around $1-$3 per square foot
Luxury Vinyl Plank (LVP): Waterproof Wonder 💧
Perfect for kitchens, bathrooms, and basements, LVP offers:
- 100% waterproof construction that handles spills and moisture
- Easy click-together installation similar to laminate
- Realistic wood and stone looks that fool even experts
- Comfortable underfoot with built-in cushioning
- Low maintenance requirements for busy households
Engineered Hardwood: Real Wood Made Easy 🌳
For those wanting authentic hardwood without the complexity:
- Real wood veneer over engineered core for stability
- Can be floated or glued down depending on preference
- More stable than solid hardwood in varying humidity
- Professional appearance that adds significant home value
- Refinishable surface for long-term durability
What to Avoid as a Beginner ❌
While you’re building confidence, steer clear of:
- Solid hardwood nail-down installation (requires specialized tools and experience)
- Large format tile (heavy and requires perfect subfloor preparation)
- Natural stone (expensive mistakes and specialized cutting tools needed)
- Carpet installation (stretching requires professional equipment)
Essential Tools and Equipment Checklist 🧰
Having the right tools makes the difference between a smooth installation and a frustrating experience. Here’s your comprehensive toolkit:
Measuring and Layout Tools 📏
Tape Measure (25-foot minimum) A tape measure is an inexpensive hardwood floor tool every installer should have. It’s best to invest in one that you can read easily, is retractable and has a hook at the end to stay in place.
Chalk Line Essential for marking straight reference lines and ensuring your first row is perfectly aligned.
T-Square or Speed Square Helps ensure accurate 90-degree cuts and proper plank alignment.
Level (4-6 feet) Critical for checking subfloor flatness and ensuring professional results.
Cutting Tools 🔪
Circular Saw or Miter Saw For making clean, straight cuts across planks. A miter saw offers more precision for crosscuts.
Jigsaw A jigsaw is a hand-held power tool with a straight, narrow blade that moves back and forth. Jigsaws are mostly for cutting wood products, and laminate flooring is close enough to count as wood. Perfect for cutting around obstacles and making curved cuts.
Utility Knife For scoring and trimming underlayment and making precise adjustments.
Jamb Saw The jamb saw, help you remove the bottom of the door casing to install flooring flush with the walls.
Installation Tools 🔨
Rubber Mallet “Persuading” pieces of laminate flooring to come together properly is part of the installation process, and this is where a rubber mallet can help.
Tapping Block Protects your flooring while helping planks click together properly. Never use scrap flooring as a tapping block!
Pull Bar Pulling pieces of laminate together tightly, end-to-end, is a standard part of every laminate flooring installation. The thing is, you can’t use a mallet and tapping block on the ends of pieces of laminate where they meet a wall because there’s no room to swing your mallet.
Spacers Maintain proper expansion gaps around the room perimeter. Usually 1/4″ to 3/8″ depending on flooring type.
Pry Bar Essential for removing old flooring and making adjustments during installation.
Safety and Cleanup Equipment 🦺
Safety Glasses Protect your eyes from flying debris during cutting operations.
Knee Pads Installing flooring often requires hours of kneeling, making knee pads essential for comfort and safety.
Work Gloves Protect your hands while handling rough materials and tools.
Shop Vacuum Keep your workspace clean and remove debris that could affect installation quality.
Dust Masks Protect your lungs when cutting and sanding operations create airborne particles.
Tool Rental vs. Purchase 💰
Tool rental runs $50-$200 for most projects. Consider renting expensive tools you’ll rarely use:
- Professional floor nailers (if installing nail-down flooring)
- Wet tile saws (for tile projects)
- Large compressors (for pneumatic tools)
- Floor sanders (for finishing unfinished hardwood)
Purchase commonly used tools that you’ll need for future projects and general home maintenance.
Step-by-Step Installation Process 📋
Phase 1: Planning and Preparation 🎯
1. Accurate Room Measurement Measure the width of the room from the longest wall and divide the distance by the width of the planks. This will tell you what the width of the final row of planks should be. Always add 10% for waste and cutting errors.
2. Acclimation Process Before installing your new floor, let your laminate planks acclimate to the room’s temperature and humidity. Lay out the pieces of laminate in the room in which you’ll be installing them, and let them sit for at least 48 hours.
3. Subfloor Inspection and Preparation A poorly prepared subfloor can lead to uneven flooring, cracks, and other issues. Solution: Assess the subfloor for damage, levelness, cleanliness, and moisture content (wood) or RH% (concrete) before beginning installation.
Check for:
- Squeaks and loose spots (secure with screws)
- High and low areas (sand high spots, fill low areas)
- Cleanliness (remove all debris and old adhesive)
- Moisture levels (wood should be below 12%, concrete below 5 lbs/1000 ft²/24 hours)
4. Undercut Door Jambs If needed, take a plank of flooring and a section of the underlayment and lay it finished side down next to the door’s moulding. This will show you how high up you need to cut the moulding.
Phase 2: Layout and First Rows 📐
1. Establish Your Starting Point “Many people look for the longest, straightest wall,” he says. “I always start at the focal point of the floor.” That could be near a door jamb, a stair nosing or a floor register.
2. Install Underlayment Roll out underlayment perpendicular to flooring direction, ensuring seams are properly sealed and there are no gaps or overlaps.
3. Plan Your Layout Before starting, plan out the layout of the tiles to ensure a balanced and symmetrical look. Avoid narrow strips at walls by adjusting your starting position.
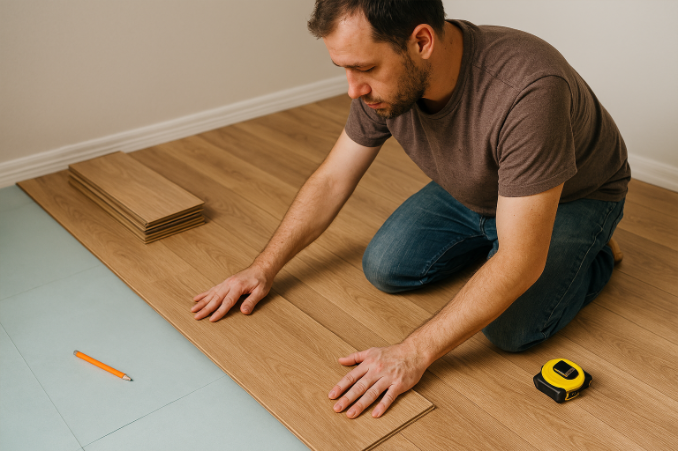
4. Install First Row One essential step in installing laminate flooring is correctly laying down the first row. This initial row sets the foundation for the entire floor, so ensuring it is straight and well-spaced is crucial.
Use spacers against the wall and ensure the first row is perfectly straight – every subsequent row depends on this foundation.
Phase 3: Main Installation Process 🏗️
1. Stagger Plank Joints Failing to stagger the planks is a common mistake that affects both the stability and aesthetics of the laminate flooring. Staggering the planks is crucial as it helps distribute weight and stress evenly across the floor.
Maintain at least 6-inch stagger between end joints in adjacent rows.
2. Maintain Proper Expansion Gaps It is generally recommended to leave an expansion gap of 1–2cm, which will allow the wood to expand and contract in an unrestricted way.
3. Click Planks Together Properly Angle planks at 45 degrees, engage the tongue and groove, then lower flat while applying pressure to ensure complete engagement.
4. Use Proper Cutting Techniques
- Measure twice, cut once
- Support both sides of cut to prevent tearout
- Cut face-up with circular saw, face-down with jigsaw
- Test fit before final installation
Phase 4: Finishing Touches ✨
1. Install Transitions and Moldings Cover expansion gaps with quarter-round or shoe molding. Install transitions between different flooring types.
2. Final Inspection and Cleanup Walk the entire floor checking for:
- Loose planks or squeaks
- Gaps that need filling
- Scratches or damage to repair
- Proper expansion gap coverage
3. Initial Maintenance Setup Clean the floor with manufacturer-recommended products and establish a maintenance routine to protect your investment.
Common Mistakes and How to Avoid Them 🚫
Mistake #1: Insufficient Acclimation
The number-one mistake when installing hardwood floors is likely improper acclimation of the hardwood. This can lead to a range of costly problems, including excessive expansion, shrinkage, dimensional distortion and/or structural damage to the boards.
Solution: Allow flooring materials to acclimate for 48-72 hours in the installation environment before beginning work.
Mistake #2: Ignoring Subfloor Preparation
The condition of your subfloor will have a direct impact on the quality of your hardwood floors. When the subfloor is not properly prepared before installation, it can lead to a number of problems, such as loose boards and loud creaking noises.
Solution: Invest time in proper subfloor preparation. It’s the foundation of your entire project.
Mistake #3: Inadequate Expansion Gaps
Improperly installed expansion joints on the edges of the floor will not accommodate the wood’s natural tendency to expand and contract. As a result, the floor could expand directly into the wall or buckle in the middle.
Solution: Follow manufacturer specifications for expansion gaps and don’t let baseboards or furniture compress these spaces.
Mistake #4: Poor Staggering Patterns
Random-looking staggering creates visual appeal and structural strength. Avoid:
- H-patterns (joints aligning every other row)
- Step patterns (consistent stagger distance)
- Too-short stagger distances (less than 6 inches)
Mistake #5: Rushing the Installation
Some homeowners make the common mistake of rushing through the project before thoroughly securing the boards.
Solution: Take your time! Quality installation requires patience and attention to detail.
Troubleshooting Common Problems 🔧
Problem: Planks Won’t Click Together
Causes: Debris in groove, damaged tongue/groove, or manufacturing defect Solutions:
- Clean grooves thoroughly with vacuum and brush
- Check for damaged pieces and replace if necessary
- Ensure proper angle during installation (usually 45 degrees)
Problem: Gaps Between Planks
Causes: Poor subfloor preparation, inadequate acclimation, or installation in extreme weather Solutions:
- Small gaps: Use color-matched wood filler or caulk
- Large gaps: May require partial reinstallation with proper acclimation
Problem: Bouncy or Squeaky Floor
Causes: Inadequate subfloor fastening, moisture issues, or improper underlayment Solutions:
- Secure subfloor with additional screws into joists
- Check for moisture problems and address at source
- Ensure underlayment is properly installed without gaps
Problem: Visible Plank Edges
Causes: Insufficient tapping during installation or damaged locking mechanism Solutions:
- Use tapping block and mallet to close gaps
- Replace damaged planks if locking system is compromised
Problem: Uneven Flooring Surface
Causes: Subfloor irregularities or improper installation technique Solutions:
- Check subfloor flatness (should be within 3/16″ over 10 feet)
- Use floor leveling compound for low spots
- Sand down high spots carefully
Cost Breakdown: DIY vs. Professional Installation 💸
DIY Installation Costs
Material Costs (500 sq ft example):
- Laminate flooring: $800-$2,000
- Underlayment: $75-$150
- Transition strips: $50-$100
- Tools (purchase): $200-$400
- Tools (rental): $50-$150
- Total Material & Tools: $1,175-$2,800
Professional Installation Costs: Most homeowners spend between $3 and $22 per square foot to install new flooring
- Labor: $1,500-$4,000 (500 sq ft)
- Materials: $1,000-$2,500
- Total Professional Installation: $2,500-$6,500
Your Potential Savings: $1,000-$4,000! 💰
Time Investment Analysis
DIY projects almost always take longer than expected—usually 3-5 times longer than professional installation. For a 500 sq ft room:
- Professional installation: 1-2 days
- DIY installation: 3-5 days (spread over 2-3 weekends for most people)
The time investment pays off when you consider the money saved and skills gained!
When to Consider Professional Help 🤝
While DIY installation can save significant money, some situations warrant professional assistance:
Complex Layout Requirements
- Multiple room installations with intricate transitions
- Stairs and curved areas requiring specialized techniques
- Historic homes with unique architectural challenges
Structural Issues
- Major subfloor problems requiring structural repairs
- Moisture problems that need professional assessment
- Foundation settling causing significant floor irregularities
Time Constraints
- Tight deadlines for move-in or special events
- Limited availability to dedicate multiple weekends to the project
- Commercial installations requiring rapid completion
Specialized Materials
- Exotic hardwoods requiring specific installation techniques
- Large format tiles needing perfect subfloor preparation
- Intricate patterns like herringbone or parquet
Remember: A licensed and manufacturer-trained/approved installer stands behind their work with a 100% satisfaction guarantee.
Maintenance Tips for Long-Lasting Results 🧽
Daily Maintenance
- Sweep or vacuum regularly to prevent scratches from debris
- Clean spills immediately to prevent staining or water damage
- Use furniture pads to protect against scratches and dents
Weekly Maintenance
- Damp mop with manufacturer-approved cleaner
- Avoid excessive water, especially on laminate and hardwood
- Check for loose planks or developing problems
Seasonal Maintenance
- Adjust humidity levels to prevent expansion/contraction issues
- Inspect and tighten transition strips if necessary
- Touch up scratches or wear spots before they become major problems
Long-term Care
- Refinish engineered hardwood every 7-10 years
- Replace worn areas in laminate installations
- Consider professional deep cleaning every few years
Maximizing Your Investment Value 📈
Your DIY flooring installation isn’t just about saving money on labor – it’s about creating long-term value for your home. Here’s how to maximize that investment:
Choose Quality Materials
While it’s tempting to go with the cheapest option, investing in quality flooring materials pays dividends:
- Better durability means longer replacement cycles
- Higher-end products often have better warranties
- Quality materials are easier to install and maintain
Document Your Work
Keep detailed records of your installation:
- Photos of the installation process
- Receipts for all materials and tools
- Warranty information for flooring products
- Installation date and any issues encountered
This documentation helps with insurance claims, warranty issues, and adds credibility when selling your home.
Plan for Future Maintenance
Set aside money for future maintenance and repairs:
- Keep extra planks for future repairs
- Stock up on approved cleaning products
- Plan for periodic refinishing or replacement
Environmental and Health Considerations 🌱
Modern flooring options offer excellent environmental benefits:
Low-VOC Options
Many flooring products now feature low or no volatile organic compounds (VOCs), improving indoor air quality.
Sustainable Materials
- Bamboo flooring offers rapid renewability
- Reclaimed hardwood provides character with environmental benefits
- Recycled content in laminate and vinyl products
Health Benefits
- Hard surface flooring reduces allergens compared to carpet
- Easy cleaning prevents mold and mildew growth
- No carpet padding means fewer chemical off-gassing concerns
Technology Integration in Modern Flooring 💻
As we advance into 2025, flooring technology continues to evolve. For more insights into how technology is transforming home improvement, check out our comprehensive guides on AI tools for productivity that can help you plan and manage your flooring projects.
Smart Home Integration
- Heated flooring systems with app control
- Moisture sensors that alert you to potential problems
- Smart lighting that highlights flooring beauty
Advanced Materials
- Scratch-resistant surfaces that maintain appearance longer
- Antimicrobial treatments for healthier homes
- Improved locking systems for easier DIY installation
Conclusion: Your Path to Beautiful, Affordable Flooring 🏁
DIY flooring installation represents one of the best opportunities to significantly improve your home while saving thousands of dollars. With proper planning, the right tools, quality materials, and attention to detail, you can achieve professional-quality results that will serve your family for decades.
Remember these key takeaways:
✅ Start with beginner-friendly materials like laminate or LVP for your first project ✅ Invest in quality tools – they make the job easier and results better ✅ Take time for proper preparation – rushing leads to costly mistakes ✅ Follow manufacturer instructions precisely to maintain warranties ✅ Don’t hesitate to seek help when you encounter challenges beyond your skill level
The average DIY flooring installation saves homeowners $2,000-$4,000 in labor costs while providing valuable skills and incredible satisfaction. Whether you’re updating a single room or planning a whole-house renovation, the principles and techniques outlined in this guide will help you achieve beautiful, professional-quality results.
Ready to transform your home with stunning new floors? Gather your tools, choose your materials, and dive into this rewarding project. Your floors – and your wallet – will thank you!
For more home improvement and technology tips, explore our other guides on laptop-to-TV connections for planning and viewing your flooring projects, or learn about cloud storage solutions to back up your project photos and documentation.
Happy flooring! 🔨✨
Have questions about your specific flooring project? Share your challenges in the comments below, and our community of DIY enthusiasts will help you find solutions!